How to Add Recipe Rich Pins the Easy Way!
Written by: Anyonita Green on
Pinterest Rich Pins are pins on steroids. They include vital information that you'll want pinners to see and displays it in a structured format.
Instead of populating the pin description box with information you want all pinners to see, such as ingredients or cooking time, you can leave this information to the rich pin format.
Rich pins are also valuable for bloggers because they automatically update themselves when changes are made on the page that they are linked to. Rich pins also make it easy for pinners to identify your brand and encourages them to visit your blog. Think of rich pins like a teaser: pinners will see the basic information (the ingredients in the recipe) for the instructions, they are encouraged to and they must click on the pin and visit your website, fostering a boost in traffic.
In this tutorial, I'll show you how to easily incorporate rich pins on your blog in a few simple steps.
Incorporating rich pins is an easy thing to do but it will greatly enhance the appearance of your blog's recipes when posted on Pinterest. Rich pins use a simple HTML markup to function that requires minimal coding to execute. Once you have coded your blog, you will need Pinterest to validate your blog for rich pins which usually takes about 2 to 3 days.
What exactly is a rich pin?
This is what a rich pin looks like on Pinterest. I have chosen to only provide a few bits of vital information: a few keywords such as the category the recipe belongs to, the number of servings the recipe yields and the ingredients.
The Pinterest rich pins markup automatically slots the ingredients under the appropriate heading --ie: produce, condiments etc. Now every recipe I share is kitted with the Pinterest rich pins format, making it easy for pinners to see exactly what the recipe has to offer. If someone has a food allergy, they can see key ingredients right away and can then decide whether to click through to your blog. As a result, rich pins are more valuable and more important than ordinary Pinterest pins.
Adding Pinterest rich pins markup to your template
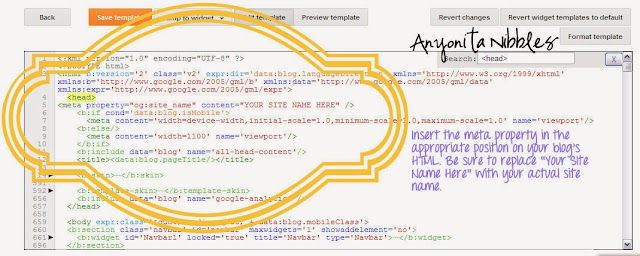
You will need to edit your blog's HTML. Please get into the habit of backing up your blog before you edit the main HTML. One mistake could cost you months or years of work. Once you have backed up your blog, search for the <head> and add this immediately beneath it:
<meta property="og:site_name" content="YOUR SITE NAME HERE" />
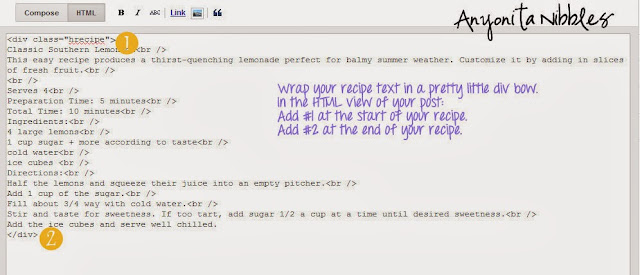
<div class="hrecipe">
</div>
Love Pinterest? Optimize your Pinterest for maximum growth with these tutorials:
How to Optimize Photos for Pinterest
Why, When & How to Watermark Blog Photos
DIY Stunning Titled Photos in 5 Easy & Free Steps
Instead of populating the pin description box with information you want all pinners to see, such as ingredients or cooking time, you can leave this information to the rich pin format.
Rich pins are also valuable for bloggers because they automatically update themselves when changes are made on the page that they are linked to. Rich pins also make it easy for pinners to identify your brand and encourages them to visit your blog. Think of rich pins like a teaser: pinners will see the basic information (the ingredients in the recipe) for the instructions, they are encouraged to and they must click on the pin and visit your website, fostering a boost in traffic.
In this tutorial, I'll show you how to easily incorporate rich pins on your blog in a few simple steps.
What exactly is a rich pin?
This is what a rich pin looks like on Pinterest. I have chosen to only provide a few bits of vital information: a few keywords such as the category the recipe belongs to, the number of servings the recipe yields and the ingredients.
The Pinterest rich pins markup automatically slots the ingredients under the appropriate heading --ie: produce, condiments etc. Now every recipe I share is kitted with the Pinterest rich pins format, making it easy for pinners to see exactly what the recipe has to offer. If someone has a food allergy, they can see key ingredients right away and can then decide whether to click through to your blog. As a result, rich pins are more valuable and more important than ordinary Pinterest pins.
Adding Pinterest rich pins markup to your template
You will need to edit your blog's HTML. Please get into the habit of backing up your blog before you edit the main HTML. One mistake could cost you months or years of work. Once you have backed up your blog, search for the <head> and add this immediately beneath it:
<meta property="og:site_name" content="YOUR SITE NAME HERE" />
Adding Pinterest rich pins markup to your posts
In this part of the tutorial, I'm going to show you the most common ways to markup your post with the rich pins markup. We'll look at marking up your title, recipe yield, prep, cook and total time as well as ingredients. Pinterest only requires that your title and some of the ingredients get marked up, however. If you normally include preparation and cooking times and servings, then you can include them in your rich pins, as well.
To get started, choose a post that is already published on your blog and has already been pinned. When I first did this on my blog, I chose my most pinned recipe at the time. I don't know if it made a difference, but it only took me a day to get approved by Pinterest. Anyway, choose your recipe, open it and click "HTML" to edit the HTML for the post.
Markup your entire recipe
The first and required markup we're going to make is for the entire recipe. This bit of code tells Pinterest that the information between the opening and closing elements is of interest.
Find the beginning of your recipe in your HTML and right above the first line, type this:
Find the end of your recipe in your HTML and right below the last line, type this:
Markup your recipe's title
The next bit of your recipe that gets the markup treatment is your recipe's title. For this to be effective, you must type the title of your recipe in the body of your post. Do not rely on it putting it as the title of your post.
Locate the title of your recipe in your HTML and apply the following markup around the title:
<span class="fn">RECIPE TITLE</span>
Markup your recipe's ingredients
Markup the most important or all of your ingredients in a similar way. Here's how:
<span class="ingredient">YOUR INGREDIENT </span>
You will need to add these three markups to every recipe post you would like to make rich pins compatible. Remember, you do not have to markup all of the ingredients, just a few.
Once you have marked up your recipe, hit the "update" button to republish your post. You should not be able to see any changes to your post from the published view. All of the markup should only be visible when you view your page's HTML. If you can see any of the markup, you have most likely failed to close a tag.
Getting approval from Pinterest for rich pins
Finally, you will need to submit your post to Pinterest for them to approve you for rich pins. This is fairly easy to do and all it requires is you logging into the Pinterest developer site and using the Pinterest rich pins validator. You will need to copy and paste the URL of the post you marked up for Pinterest to approve.
Once you have pasted the URL in and clicked the validate button, you will be shown a preview of what your pin would look like with the rich pins formatting. That's it. The next step would be to wait for Pinterest to approve your rich pins request. They will notify you via email once you have been approved. I was approved within a day but some bloggers have reported it taking up to 3 days to get approval.
Addendum: In May 2014, I received a very bullying email from a fellow blogger accusing me of "lifting" this tutorial from her blog and therefore violating her copyright policy. Despite my emphatic explanation that this was certainly not the case, she beleaguered the notion that I violated her copyright. I wanted to make you, my reader, aware of this bogus claim and assure you that I have not in this instance or any instance ever and will never take someone's work and pass it off as my own. I hope you trust that the time and effort that goes into every post on Anyonita Nibbles is the result of my own hard work and dedication and that it is never ever at the expense of another blogger. The fact of the matter is that when it comes to recipes and blog tutorials, there is bound to be some overlap. This does not mean that a work has been plagiarized. However, according to the DMCA, if someone feels their work has been plagiarized, the accused must respond. This is my response to the outrageous email I received from the bullying, unrealistic blogger and this is my statement that this post is not in any way shape or form a replica or tweak of any post on her or anyone's blog. This is also my statement this post has not been influenced by any work on her blog or anyone else's blog, either. ---Anyonita
Love Pinterest? Optimize your Pinterest for maximum growth with these tutorials:
How to Optimize Photos for Pinterest
Why, When & How to Watermark Blog Photos
DIY Stunning Titled Photos in 5 Easy & Free Steps


For those of us using WordPress, I found a plugin that will do all this work for you. If you are using the Ziplist Recipe Plugin, you can add an additional plugin called "Recipe Rich Pins for ZipList." It adds all the markup for you automatically for every recipe you've added with the original Ziplist plugin. Then, all you do is go to the Rich Pin Validator on Pinterest (Anyonita has the link above), and just C&P any recipe blog post that you've used with the Ziplist plugin. You'll see it pop up with what your rich pin will look like, then apply for validation. That's it!!
ReplyDelete