How to Autofill Pinterest Pin Descriptions
Written by: Anyonita Green on

Autofilling the description of Pinterest pins from your site is one way to ensure that pinners get valuable information about what they will find on your blog.
Of course, pinners can always go back and change this description, but in my experience, if a pin's description is informative enough to give pinners a sense of what to expect on the page, they don't tend to edit the description.
If you autofill the description of pins from your site, you increase the likeliness that the keywords you have chosen will stay attached to your content; thereby boosting your SEO.
In this tutorial, I'll show you two quick methods for autofilling the description of your Pinterest, including how to do it via simple HTML coding.
Autofill your Pinterest Pins with Alt & Title Text
Pinterest pulls each pin description first from the alt text and, if there is nothing there, from the title text. If neither field is filled in, Pinterest uses the actual image name as it was saved on the device where the photo was uploaded from.
The pin description is a valuable space for using keywords either with or without hashtags. It's important for pinners because it's the bit that convinces them to click through to the website to view the post in full. Letting the space go to waste is senseless.
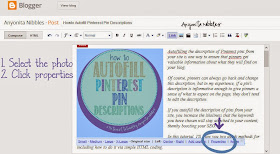
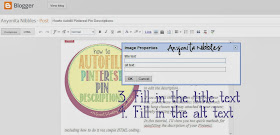
You can easily populate the alt and title text in Blogger by following these five steps:
- Click the photo you'd like to amplify
- Choose properties
- Fill in the title text field
- Fill in the alt text field
- Click ok
Autofill your Pinterest Pins with HTML
If you're not on Blogger or compose your posts in HTML, you can use a bit of code to produce the same results. Here's what you'll need to do:
<img src="https://blogger.googleusercontent.com/img/b/R29vZ2xl/AVvXsEi2-7J4n9O3YOlQ5u6fa5SjwlsG-7Gg_G6AiqY4Tr19ps-19wHrYkfGzSwBETrv5EWOXAQBBLafCU-fPreaDfU60L-7gI98yAPpB8KmwXxVR_N_NBKewoCFbNOGfIZszLAZpw-Xx5D7WV4/s1600/autofill pinterest pin descriptions.png" alt="How to Autofill Pinterest Pin Descriptions | Anyonita Nibbles" title="How to Autofill Pinterest Pin Descriptions | Anyonita Nibbles" />
No matter which method you use, the outcome is the same. Your Pinterest pins from your site will automatically be autofilled with the content you want them to have:
What to Say in the Pin Description
Here are some do's and don't's you might find helpful:
- When filling in your title and alt text, don't go overboard with hard selling your blog post. You'll need to strike a balance between being descriptive and informative and giving enough information to bait pinners.
- Try to stick to the facts, but don't give everything away up front.
- Use hashtags sparingly if you want to
- Don't feel obligated to use hashtags if they're not your style
- Speak about the post from a different point of view. How would you describe it if it weren't your own post?
- Be proactive.
- If the title isn't straightforward, use the description to unmuddy the water.


great post! Thanks for sharing. I always add more info to the description when I pin my own images, but that doesn't help for when others pin my stuff...This is great! I've also applies for rich pins.. still waiting to hear back!
ReplyDeleteYes, but now if you add that stuff to the alt text, it WILL help for when others pin :) That's the beauty of it! And you'll enjoy the rich pins; I think they're a big help!
DeleteI am always too lazy to change the description and I think most people are the same, so this is helpful!
ReplyDeleteI knew that there was the alt text on blogger but never used it. Will be doing it know. Thanks and pinning.
ReplyDeleteG'day! GREAT hint and tip Anyonita! Love the visuals...very helpful!
ReplyDeleteCheers! Joanne
http://whatsonthelist.net
This was incredibly helpful - thank you!! :) ~ Janet / Painted Piglet
ReplyDeleteHi Anyonita! I was wondering how this information was pulled in. This is a very helpful and useful tip. Thank you for sharing.
ReplyDeleteThis is great!! I am def going to be doing this to all my front photos from now on!
ReplyDeleteThanks for the great information. As a new blogger, this is something that I had not yet even considered. I'll be doing this for my pins now. Thanks so much!
ReplyDeleteThis is a great tutorial! For anyone using self-hosted Wordpress and aren't that savvy with HTML the easiest way to achieve this is when adding your media/photo on the side where it shows you the dimensions of the image etc there is a space to fill in both your ALT title and your image title so it will automatically fill in your HTML with the correct description for pinning.
ReplyDeleteThanks Anyonita for the great source!
This is a great tip!
ReplyDeleteAgain, thanks for joining the Link Up this week!
Thank you for these tips. I have a hard time getting the description to work right, even though I always fill in both the title and the alt. I get the alt description coming up, but there are always other word before it that I have no idea where they come from. It's been confusing me ever since I switched to WordPress.
ReplyDeleteOkay,I just looked at everything and figured out it is pulling the url from the picture...how do I stop that? Thanks!!
I saw you sharing at Project Inspire{d}
Debbie :)
Hi Debbie,
DeleteThat's really strange! I've never seen that before. Could you link me to your website & I'll be happy to take a look. :)
This is SO helpful! I had no idea how to do that, but I've been wondering for a really long time! Thank you so much!
ReplyDeleteG'day! Very helpful Anyonita as part of my Blogging Crash course! I personally don't like to see pins that are blank with no description. I like to include hash tags in an entertaining way to describe my pin then mention my blog and include the blog post in the description as I find it is a lot easier for people to view!
ReplyDeleteCheers! Spreading the love on this post too!
Cheers! Joanne
http://whatsonthelist.net
Thanks for sharing. I did not know about the fill in for images. I learned something new from you today.
ReplyDeleteThank you, I've been blogging seriously for several months now and really have been hooked on Pinterest so this helps a lot. Now I get to go through my blog and make sure all the pictures get the right labels. Thanks again.
ReplyDeletehttp://nightsea90.blogspot.com/